Composition, Rule of Thirds, and Creating Flow
- Don Tredinnick
- Mar 1, 2022
- 4 min read

There is a composition technique that is referred to as the rule of thirds. Basically, the rule of thirds says that if you envision a tic-tac-toe board over your image, you can use that as a guide for the placement of the elements in the photo. This could be similar to the image above where the sandhill crane is placed on the intersection of the top and right lines. This is also referred to as the power point. In landscape photography, it is sometimes used to have the bottom third of the image contain the foreground, the middle part contain the mid-ground, and the upper part contain the sky. This is demonstrated in the shot below.

The Rule of Thirds is Only an Aid
The problem with the rule of thirds is that it is really not a rule at all. Instead, it is really an aid to help us line up the elements in the photo. In the two shots above it works nicely as is. Why is that?
In the case of the photo of the sandhill crane, it allows movement for the bird to land. Since birds don't typically drop straight down, we need to provide diagonal space in a downward direction. Positioning the bird on the intersection of the two lines helps to provide that room.
In the case of the landscape photo taken at Schwabacher Landing in the Grand Tetons, it allows me to have the reflection lower in the frame. This is important since having the reflection in the middle of the frame would make the image flat. What I mean by that is you would not get the sense of depth in the photo. This is often an issue with reflection shots.
The rule of thirds is only an aid to help with composition. The idea is really to help move the subject from the center of the photo. We can start framing up our image using the rule of thirds. That is just the first step. We must also take into account balance, flow, and the story we are trying to tell. As shown above some photos work well with applying the rule of thirds, others do not.
How I Use the Rule of Thirds
I begin by looking at the scene and try to decide, what is the primary actor in the scene, and what elements are playing the supporting role. I'll begin by positioning the primary actor on one of the power points. (By the way, most cameras provide a camera setting that will show the tic-tac-toe board in the viewfinder and on the LCD.) The next thing I look at is balance. Does the image feel weighted too much to one side or the other, or too much top to bottom. I then adjust my composition to adjust the balance.

Looking at the above image, the primary actor is the ice formation in the back ground. The ice in the foreground plays a major supporting role, and the background actor provides some context. In this case, I definitely do not want the sky to take up a third of the image. That would give too much importance to the sky. I also want to make sure that the image is balanced. For this, I want the ice covered rock on the left and the one on the right to be approximately the same distance from the edge of the frame. Similarly, the main actor and the ice formation in the front need to also be positioned at about the same distance from the edge of the frame.

Overlaying the tic-tac-toe board shows that the sky only takes up about 15% of the frame, and the foreground takes up a full 2/3rds of the frame. Also, our main subject is located in the top third towards the center.
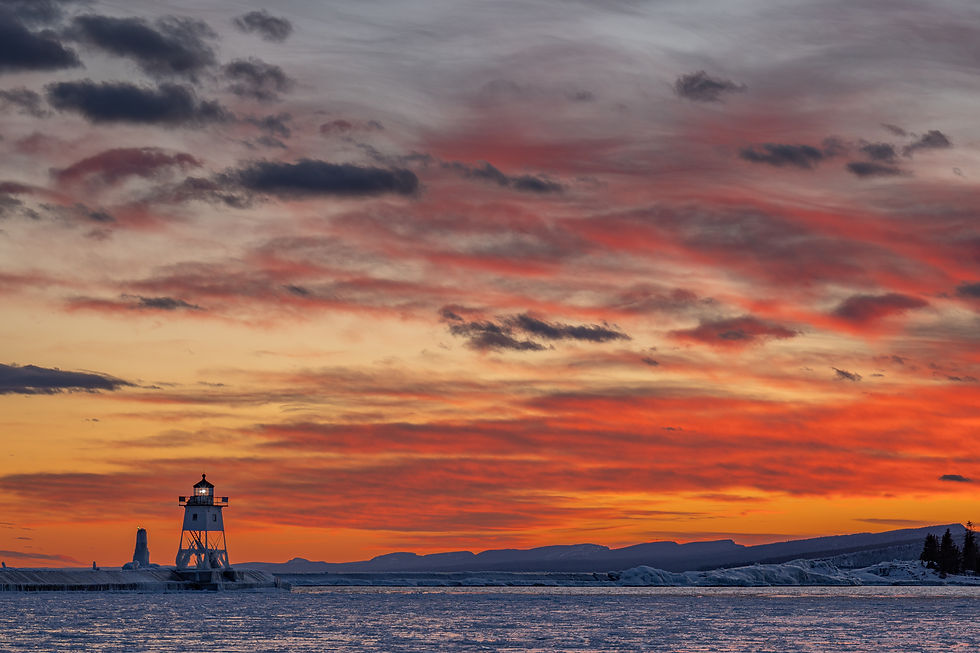
Sometimes, we need to get even more extreme in our positioning. Consider the following photo.

In this photo, the primary actor is the dramatic sky. This is something that I love about winter photography. The lighthouse is a supporting actor that is in the frame to provide context. The sky takes up 90% of the frame. The lighthouse is placed in the very bottom of the frame. If the lighthouse were placed on the intersection of the bottom and left lines of the tic-tac-toe board, it would be too strong in the image, and there would be too much water in the image.

Moving to the Center
By now, you may be thinking, that we want to avoid the center of the frame. Not necessarily, it really comes down to weight and balance. Consider the following image.

The "Little Free Library" sign in almost in the exact center of the frame. The front of the library is also centered. All of the snow on the right allows for some flow, and the plants add some nice context.

The interesting thing about the above image is that ⅓ of the image is negative space. That space is important given the orientation of the subject. It allows movement for someone to be able to approach the library.
A Couple of Other Examples
Here are two more shots where I used the rule of thirds as a starting point, and then made adjustments to get the photo that I captured.


In Summary
The process that I follow is:
Identify the primary and supporting actors.
Begin by positioning the main actor on a power point.
Adjust the balance of the image.
Adjust the weight of the image.
Provide some flow for the viewer to follow.
Complete the story.
Oftentimes, the resulting image will "violate" the rule of thirds. That is ok, since as I mentioned, the rule of thirds is really only a guide to help with composition, it is not a hard and fast rule.


Comentários